My Model Flying History (1956)
1956: It all started when I became 6 years old. My father had a colleague, Gerd Mix from Kollmar at the Elbe river, who was an experienced model flyer. So my dad asked him if he could build us a small flying model that I should be given as a birthday present. It was a rubber powered model of very light construction with tissue covering. We had it fly in the garden behind our house in the Goethestraße in Elmshorn. Since we did not get enough turns into the rubber, the flights were very short. But I was fascinated and became hooked.
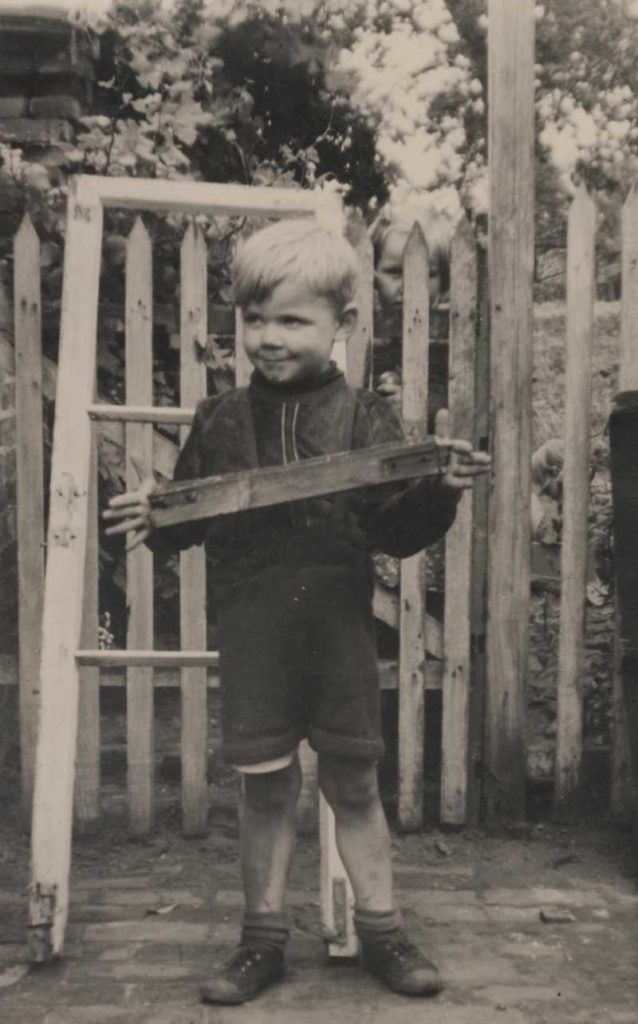
I was interested in woodwork from childhood 😉 Here I dismantled an old window frame in front of our garden gate on Goethestrasse. My sister was watching it from the background.
WSPR with Raspberry Pi
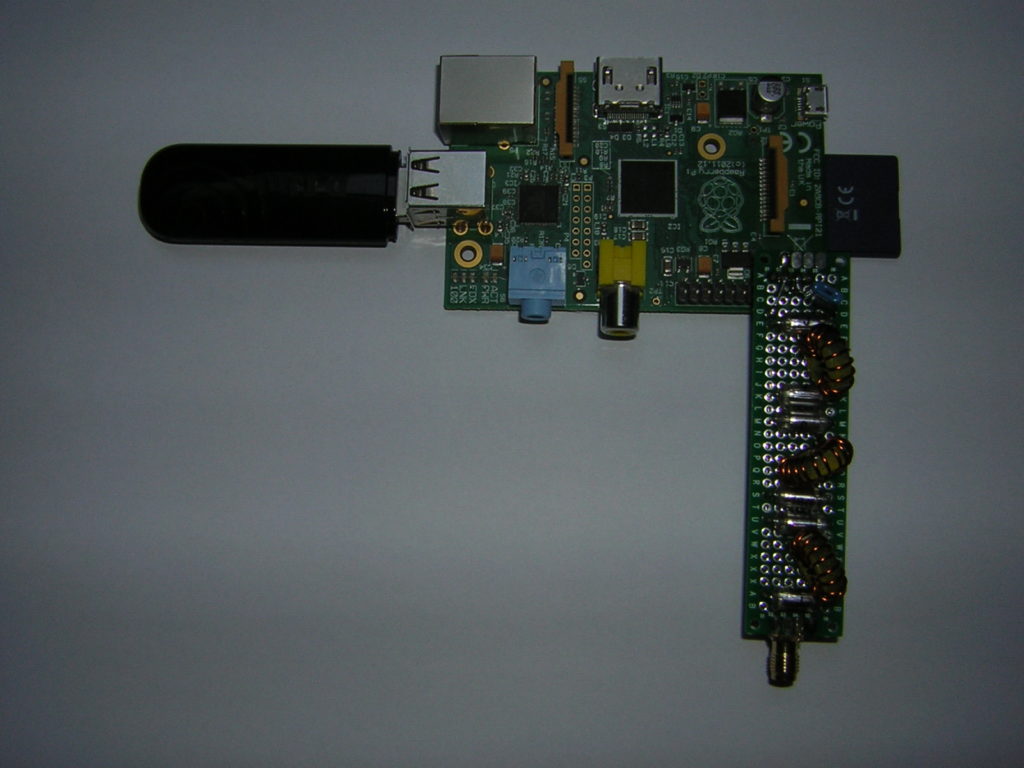
After my successful experiments with WSPR and FT8 on my FT-900, I wanted to try a low power stand alone beacon for WSPR. I happened to find an old Raspberry Pi in one of my bottomless drawers.
A search on the WEB revealed that there was a way to convert this board into a transmitter. Very inspiring instruction was found on a German website. The program called WsprryPi was downloaded from GitHub. The instructions for installation and usage on this site were very detailed and helpful.
I wanted to run the beacon autonomously without connecting another controlling PC. DL7VDX suggested to write a script which was started automatically on boot-up. I tried this, but had no real success. The easiest way was to add a command line to the /etc/rc.local file. This worked perfectly well.
The Raspi was connected to my local WLAN via a USB-stick, to receive a time signal from an NTP-server.
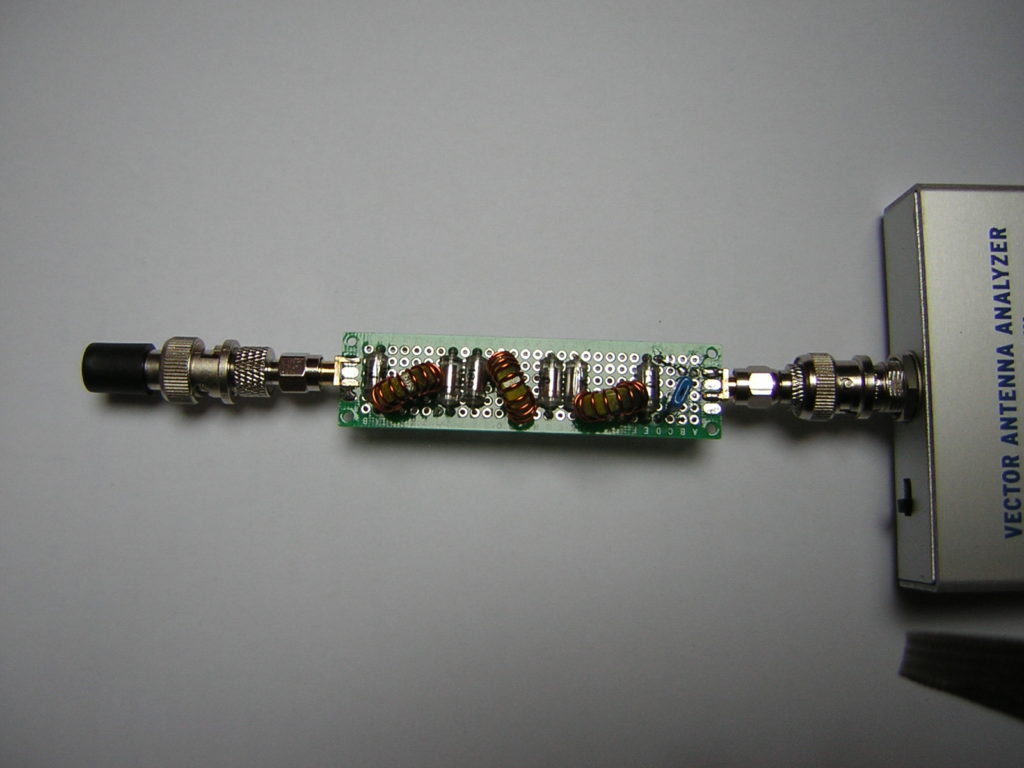
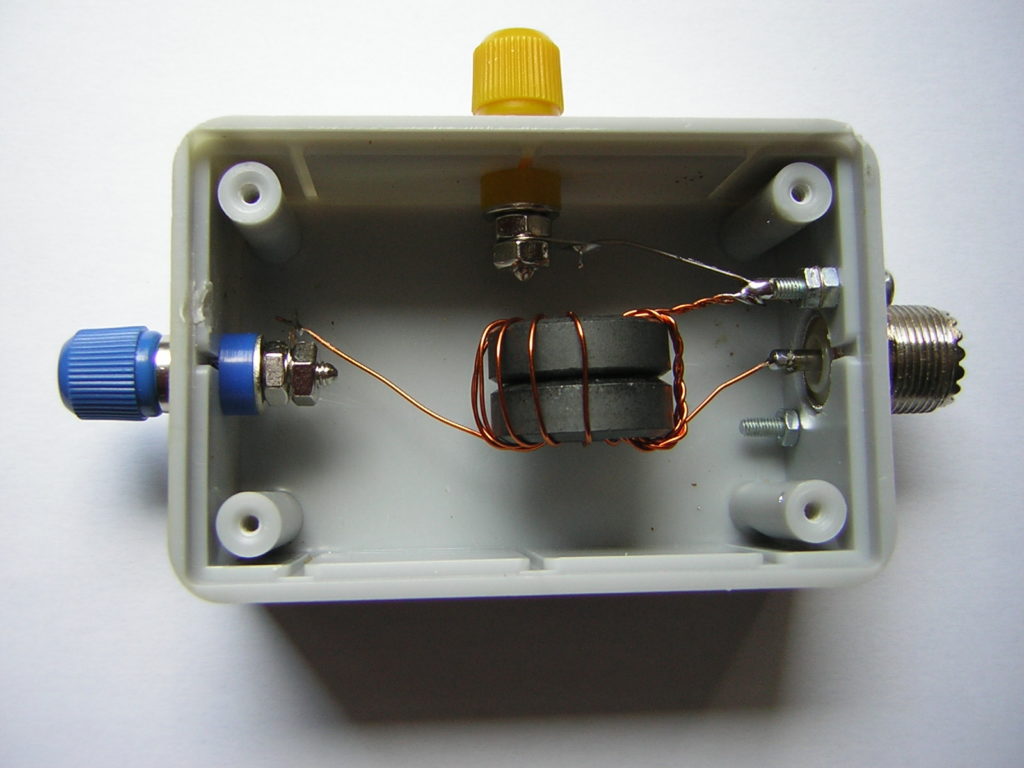
Very important: A low-pass filter had to be inserted between the output of the Pi and the antenna! I found detailed instruction for this on the QRP-Labs website. Fortunately, I had some AMIDON T-50-6 cores laying around. Three coils were wound with 0.6 mm magnet wire (~AWG 23). All the components were soldered to an experimental circuit board:
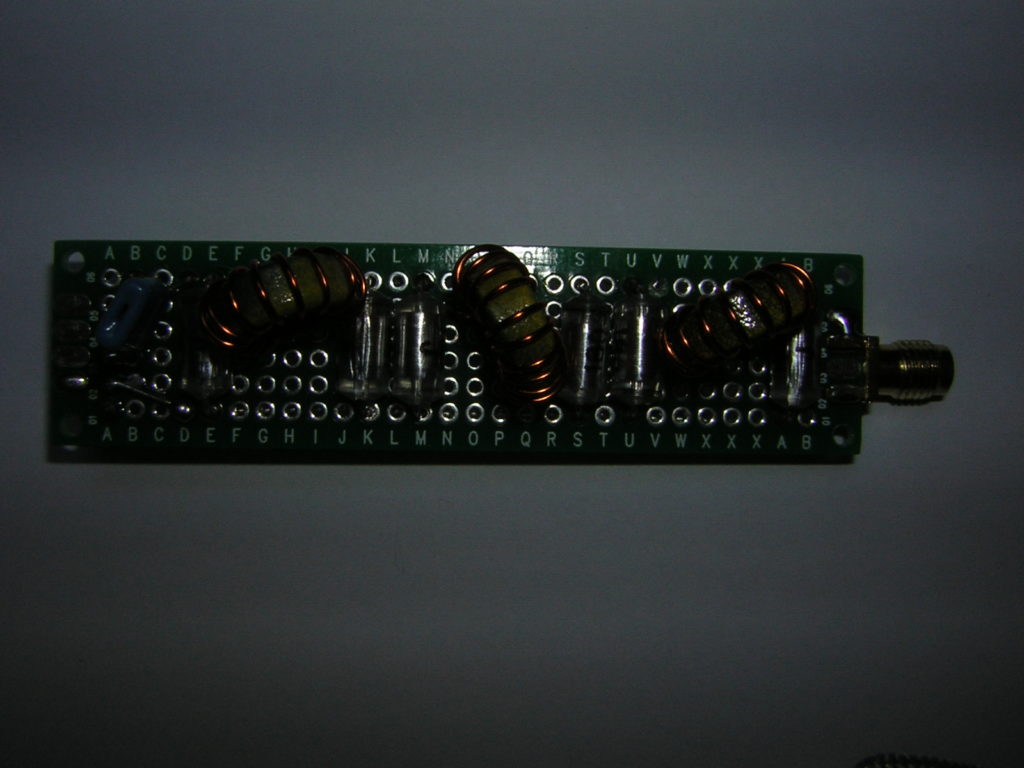
One problem was, to measure the filter’s frequency response. The only test equipment I had for this was my FA-VA5 antenna analyzer. I inserted the filter between this instrument and a 50-Ohm dummy load:
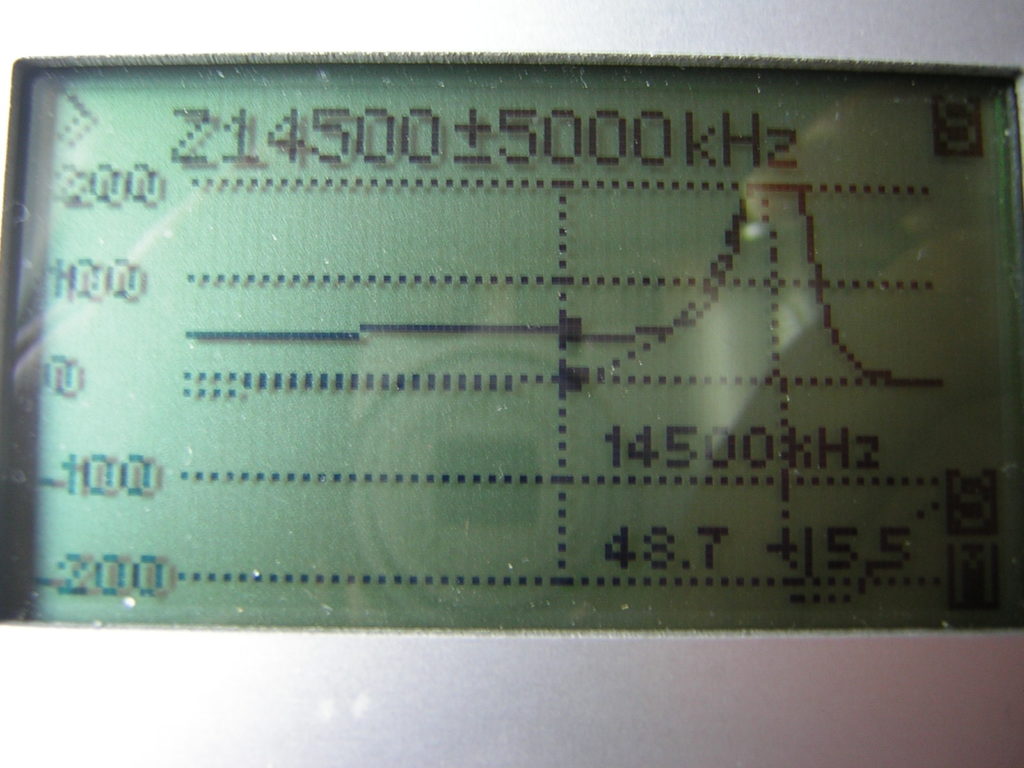
Then I scanned the Z-response . . .
. . . and SWR over frequency:
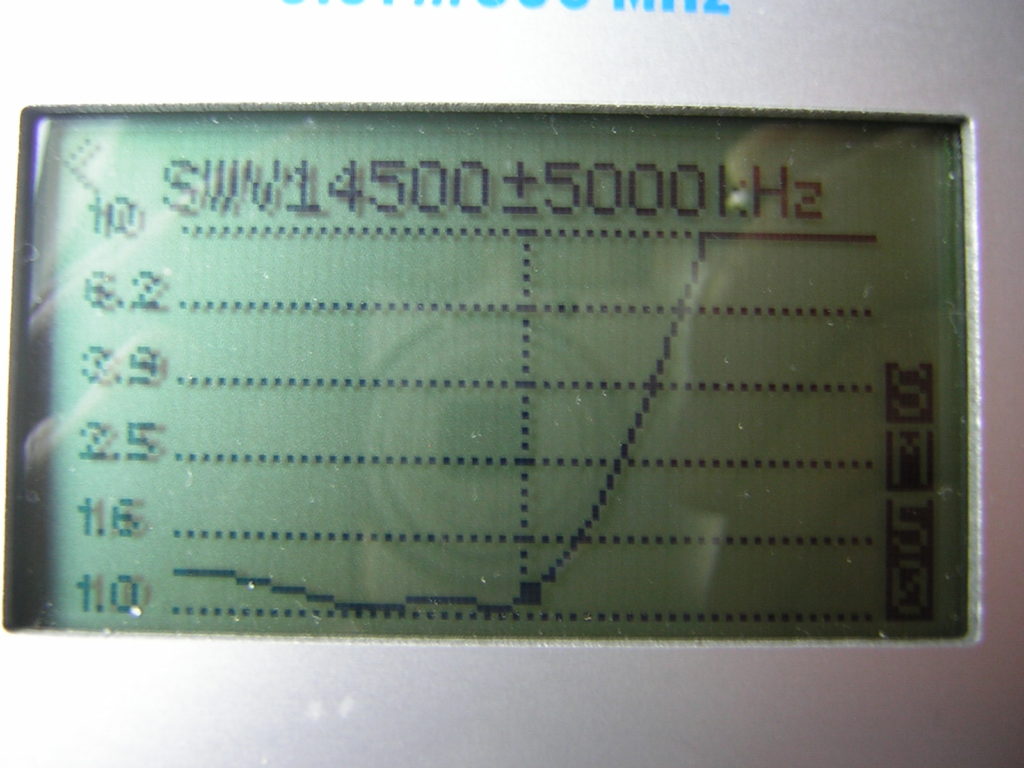
So, in my opinion, the quality of the filter was adequate.
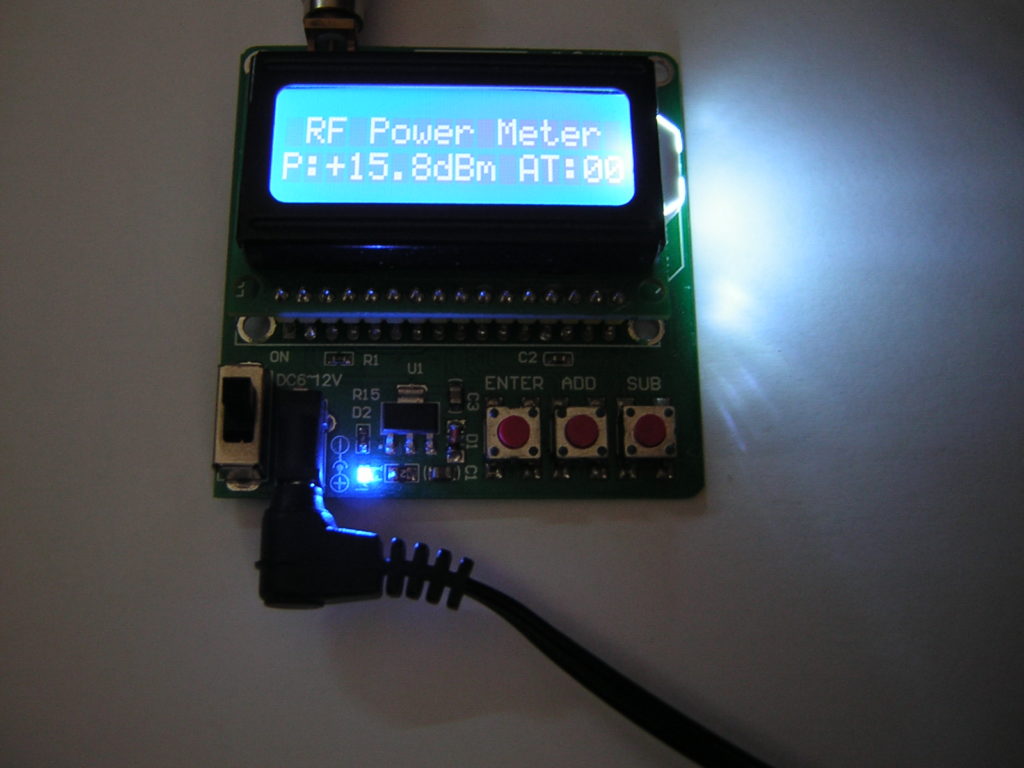
My power meter showed 15.8 dBm, which corresponds to about 38 mW.
So far, the results were very encouraging. Spots were reported from all over Europe.
My New WSPR and FT8 Setup
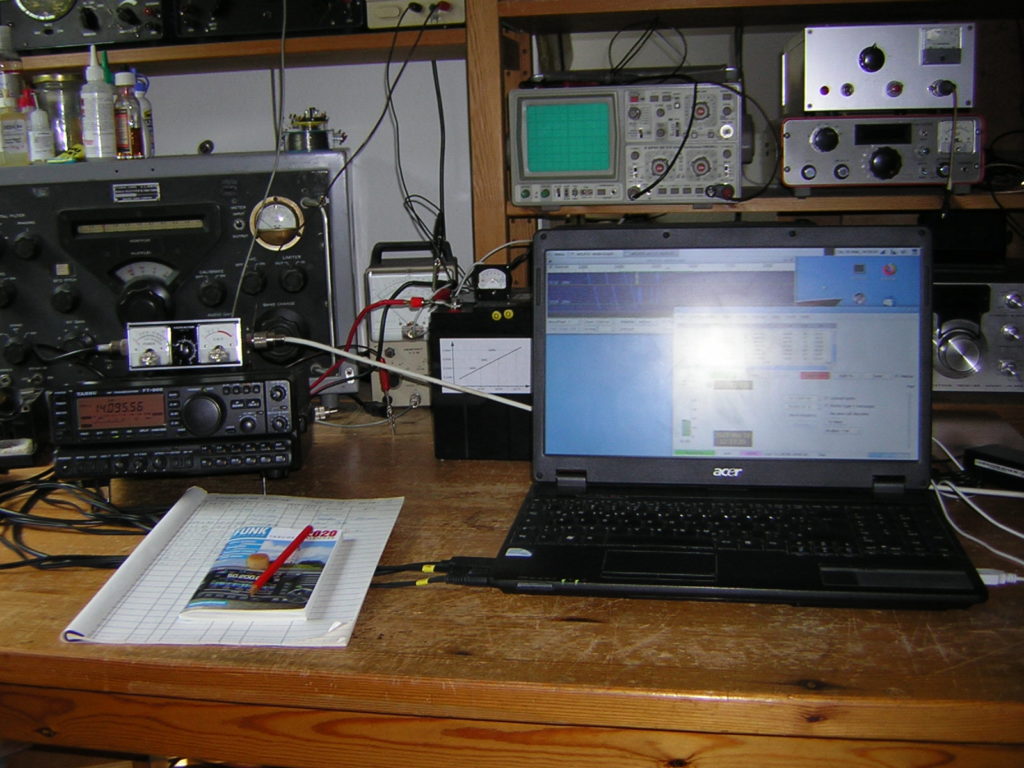
During the Corona lockdown I had some time to reactivate my Ham-Radio station. I strung a wire of 20 meters length from the window of my shack under the roof to a telescopic fishing rod of 6 meters length in my garden. Then I wound an UnUn transformer on a ferrite core, to match the wire to the 50 Ohms output of my transmitter. I followed the instructions of Steve, G0KYA but changed the impedance ratio to 1:16 (3:12 winding ratio) which resulted in perfect match on the 40m and 20m bands. My explanation for this: Some of the antenna wire was inside my shack. This increased the capacitive load at the end of the wire and reduced the impedance at this point. On 40m and 20m the SWR is under 1.5 and there is no need to use the antenna tuner of my FT-900.
This FT-900 transceiver is 21 years old. Fortunately, it already had CAT-control. The output power was reduced to 1 Watt for WSPR and 5 Watts for FT8 operation. My power supply is a 28 Ah lead acid battery, because all the switch mode supplies that I tried were to noisy.
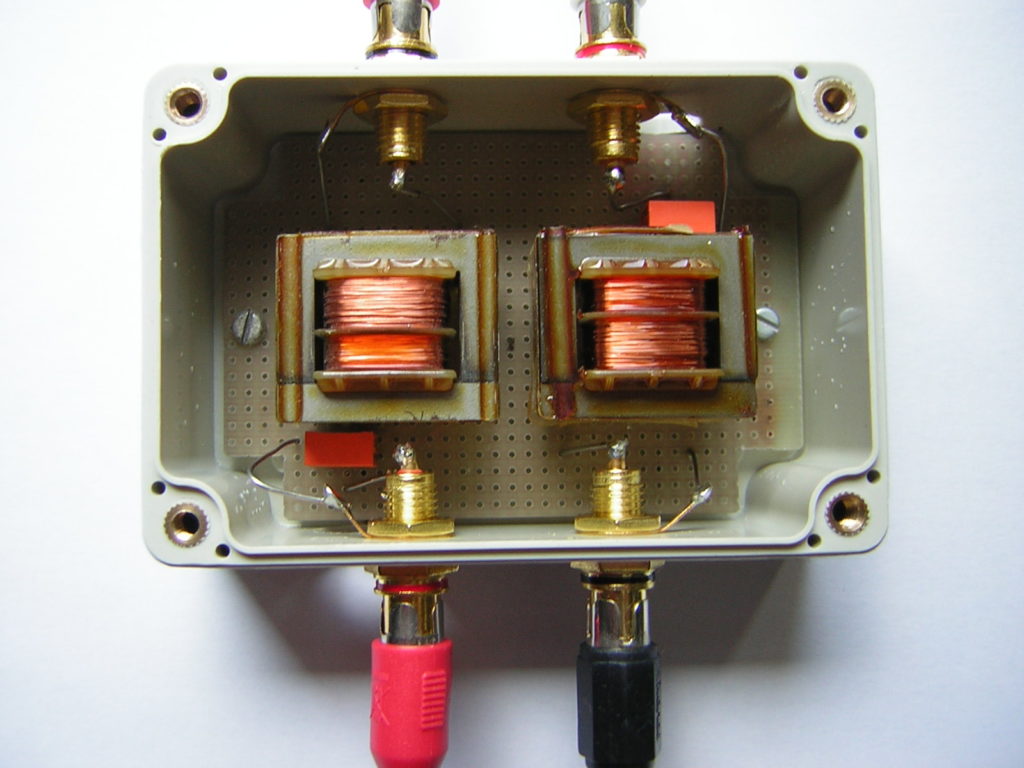
I purchased a USB to CAT cable from Steve, G8XGG which works perfectly well. For the audio connections from the TRX to the PC I made a transformer box, so that there were no ground loops. It also worked flawlessly.
My software is WSJT-X running on an old 32 bit laptop under UBUNTU-Linux.
My 30 dBm WSPR signal was already received in the USA and in Brazil. I’m very happy with that :-).
I was very surprised to find that there was much more activity on the bands in FT8 than in the traditional CW and SSB modes.
I have now replaced the laptop with a Fujitsu Thin Client S720, which was offered as a used device very cheaply (€20). It works without a screen or keyboard under Debian Linux and is controlled remotely via a VNC connection. Unfortunately there was now strong 100 Hz hum pickup on all bands. After some experiments I found out that this was obviously caused by the transformers in the audio lines between the transceiver and the thin client. That’s why I left out these transformers and made direct connections with simple audio cables. This almost completely eliminated the hum.
I also no longer use the UnUn transformer to match the antenna. I replaced it by a 200 Ohm dummy load.
Without an antenna connected, the SWR on the transceiver is now a maximum of 4:1. But, with the end-fed wire connected, it is now less than 2:1 on all bands. The built in tuner of the FT-900 can match that easily. The losses should not be higher than 3 dB. The WSPR reports achieved with 2 watts (33 dBm) are very satisfactory on all bands.
My Riser V-Tail
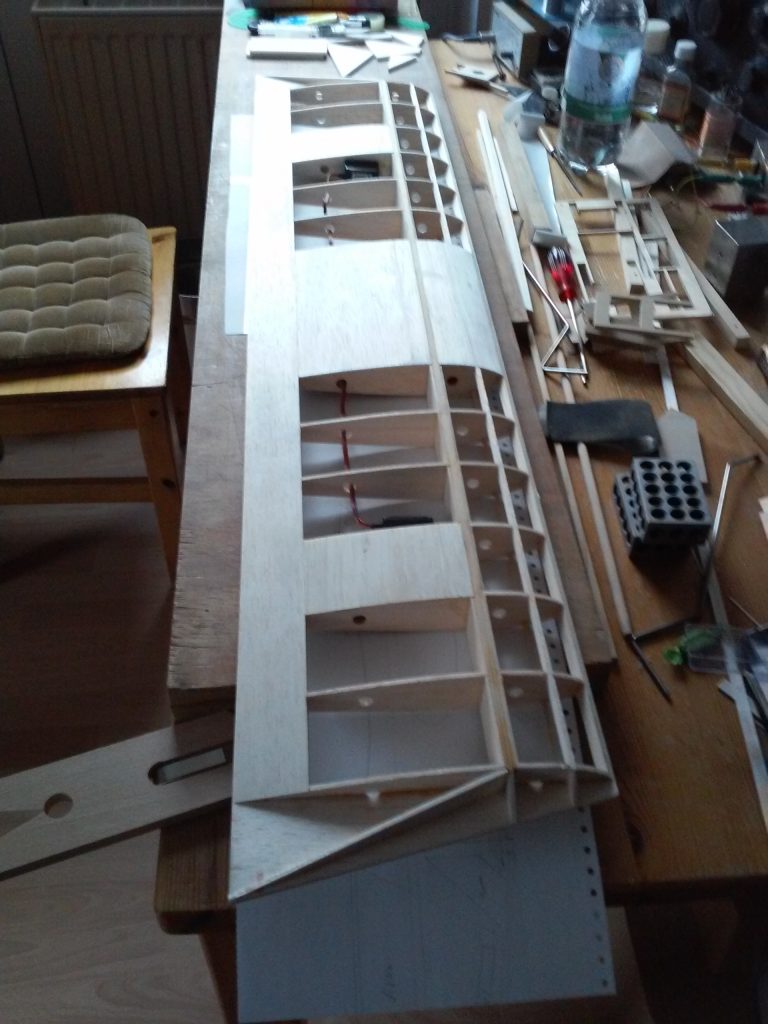
Here I want to show you my version of the SIG-Riser model sailplane.
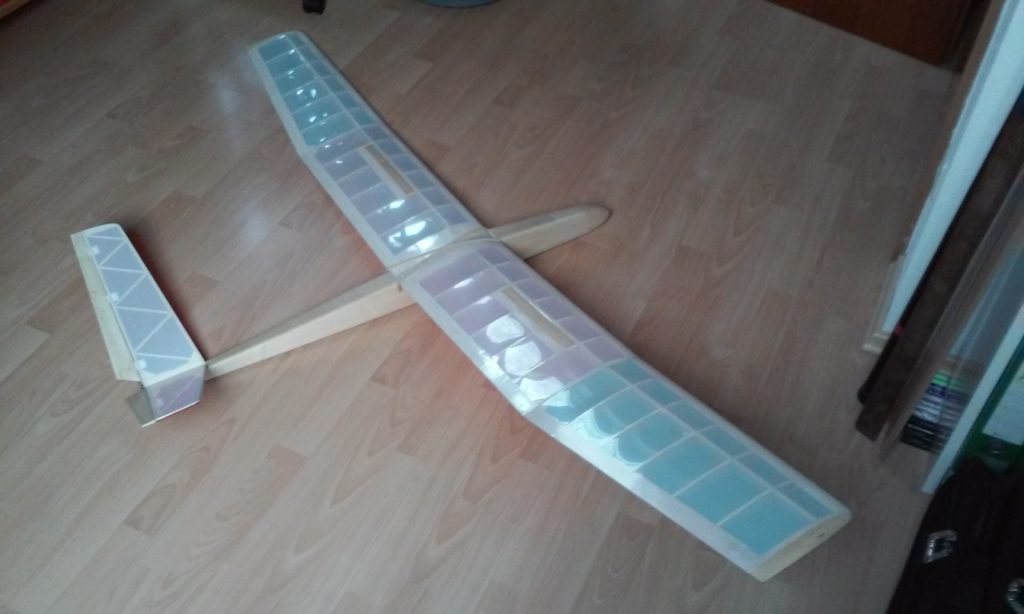
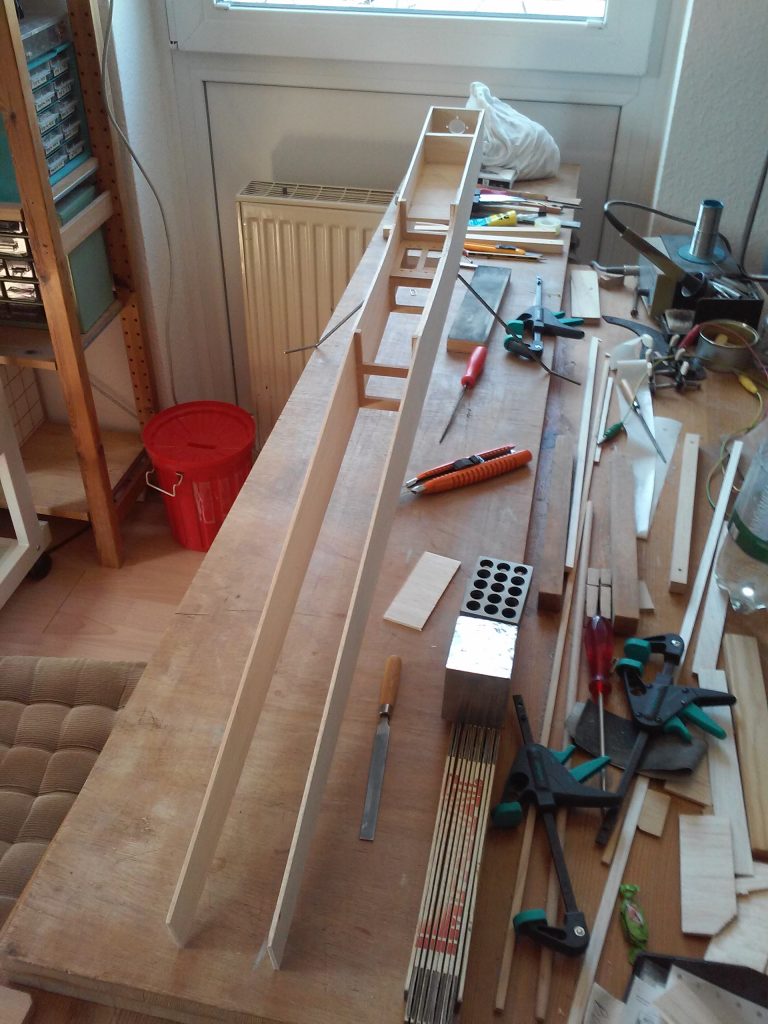
This year, the idea came up in our club, to organize a competition of the R.E.S. class. R.E.S. stands for “Rudder Elevator Spoiler”. This class for simple 2-meter model sailplanes has become extremely popular in Germany. As I wanted to participate in this contest, I had to build an appropriate model. My choice was the “Riser” offered by the SIG company. One reasson for this was the extremely low price for the kit.
The building instruction was straight foreward, so I put the plane together in very short time. When it was time to build the vertical and horizontal stabilizers, I decided to make a change. I was convinced that the normal cross tail would be to heavy. So I changed it to a V-tail. I set the opening angle between the two sides to 120 degrees and extended their length by 15 percent to get enough area in the vertical projection. I hoped that nevertheless enough controllability was given. The maiden flight should show it.
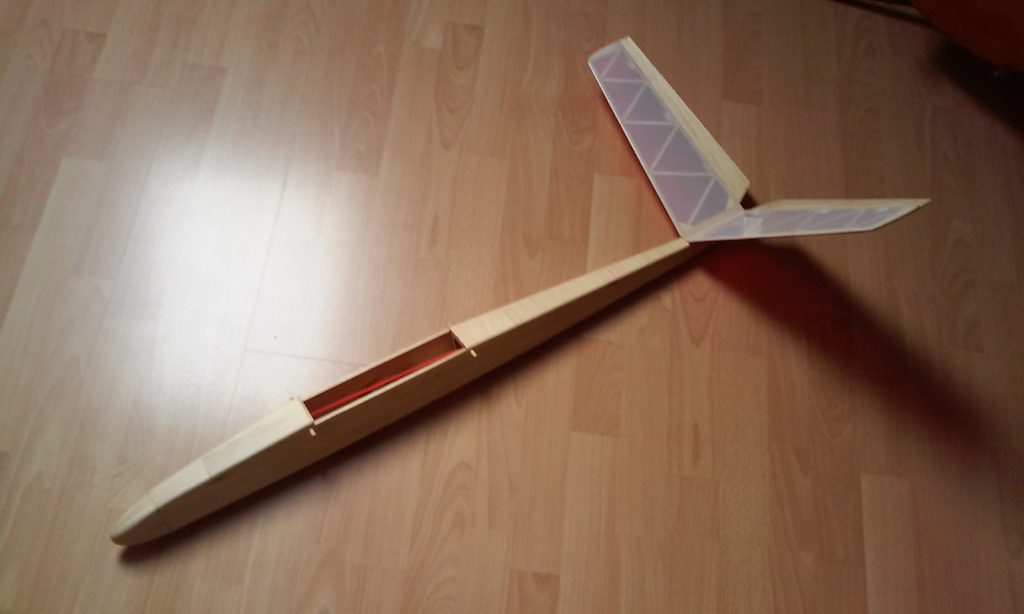
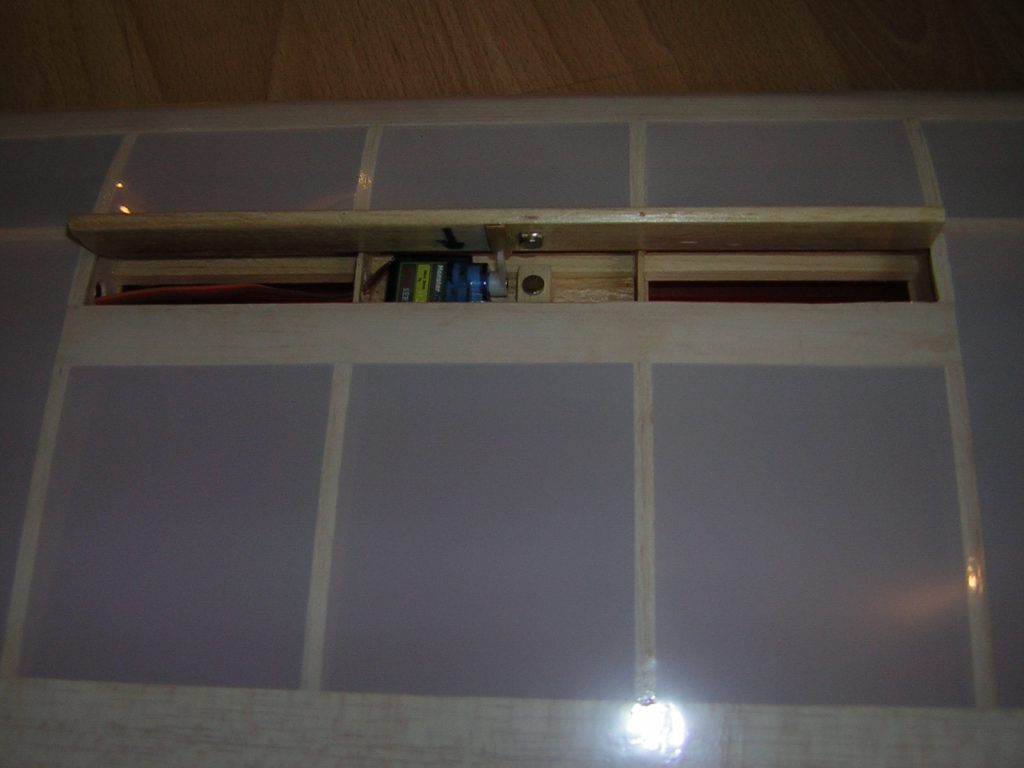
The plans for the model included an extra sheet for the installation of spoilers. Unfortunately, the material for this was not included in the kit. As I wanted to use two separate servos for the two wing sides, I had to think about a different way how to control the spoilers. Now they are hinged at the front edge with plastic tape and pushed up directly by the servo horns. Small magnets hold them down in the retracted position.
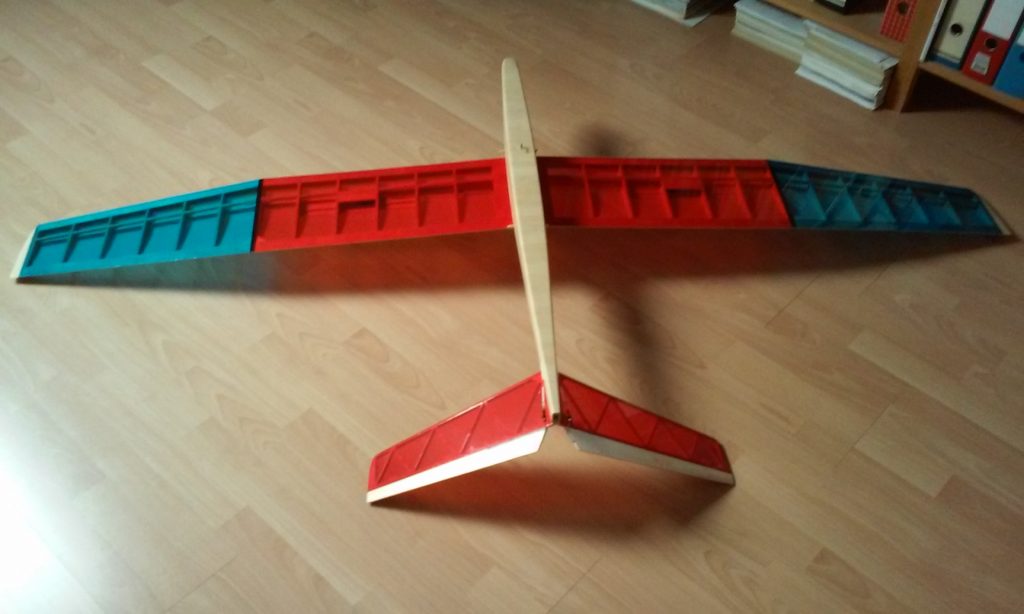
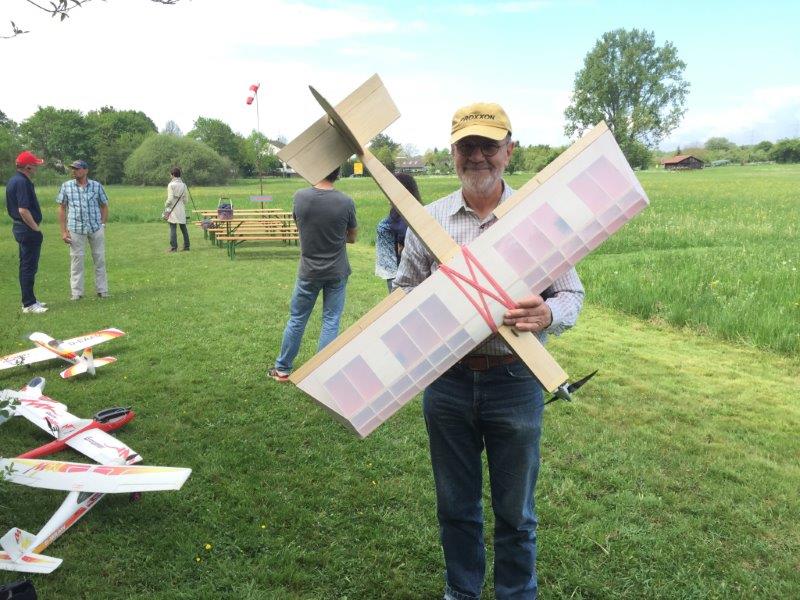
I covered the wing and the tail feathers with transparent OraLight. White on the top and red and blue on the bottom. The fuselage was just painted with clear lacquer. Despite of the lighter tail, a lot of ballast was still needed in the nose of the model to put the center of gravity in the right position. I decided to use a 2-cell LiPo of 2000 mAh combined with a UBEC-device. Now, the total flight weight came out at 630 g (~22 oz). So, this model seems to be more suitable for stronger winds.
For the high start a special rubber is required, which is extended with a fishing line. For this I made a wooden drum from a kit which was provided by Modellbau Claus Thiele.

Varioprop Conversion
Here I want to show you, how I converted an old Graupner Varioprop transmitter to 2.4 GHz.
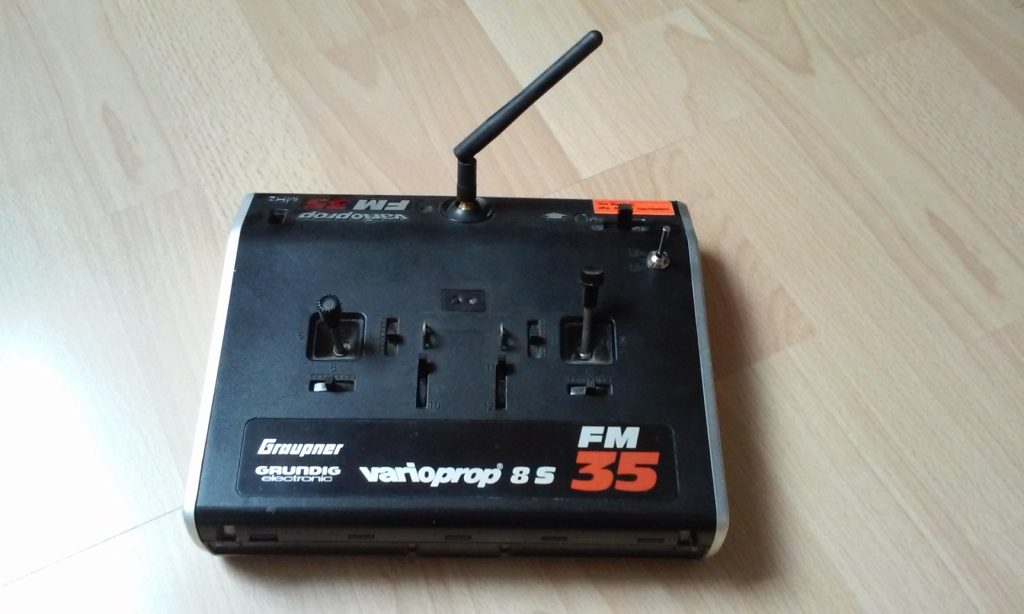
I didn’t want to have another transmitter with all kinds of bells and whistles. My intention was, to make an old transmitter usable again that was laying around in my cupboard. I have other radios that can do everything. On the other hand, I wanted to improve my programming skills for the Arduino microcontrollers.
As I wanted to use this transmitter especially for my new SFC-Stick, I limited the number of controls to four (throttle, rudder, elevator, ailerons). The two extra potentiometers in the center were not yet connected to the controller and the 3-position switch was not used in the program.
First, I removed all the electronic components, the antenna socket and the battery until only the mechanical parts (sticks) remained. Then an RF Module from FrSky (V8HT) was inserted. The new antenna socket was glued in with epoxy. Also, a new charging socket and a new on-off-switch were necessary. The battery is a 2-cell LiPo of 800 mAh which is absolutely sufficient. The transmitter now has a very low weight (670g ~23.6 oz).
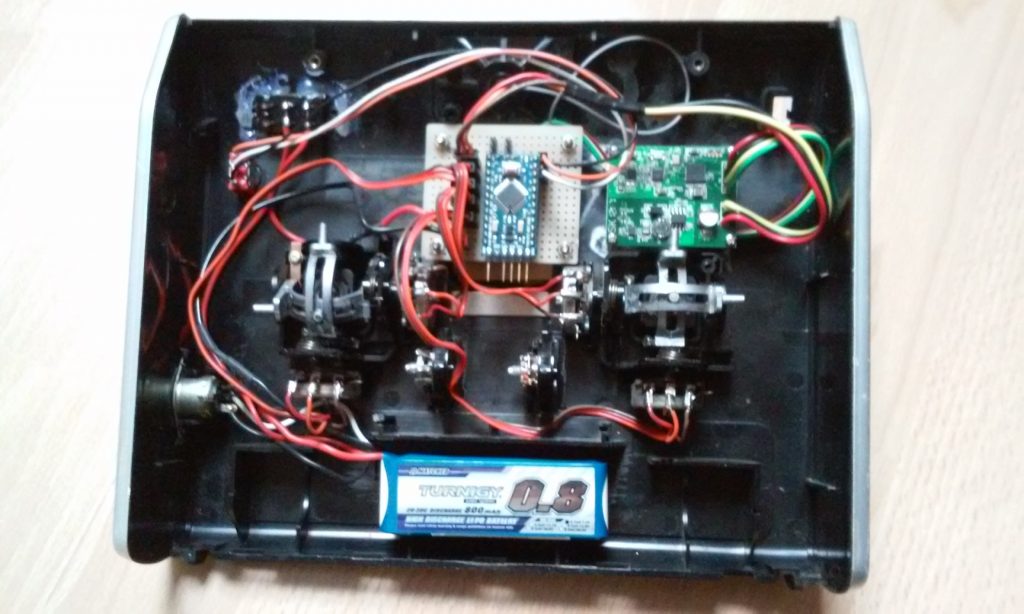

The PPM signal is provided by an Arduino Pro Mini.
You can find my sketch here: rc_encoder_sfc_stick
There is no display or keypad in the transmitter. If I want to change the program, I have to connect the Arduino to my PC and upload a modified sketch.
I use this transmitter specifically for my SFC-Stick model, which I have presented in another post.
My SFC-Stick
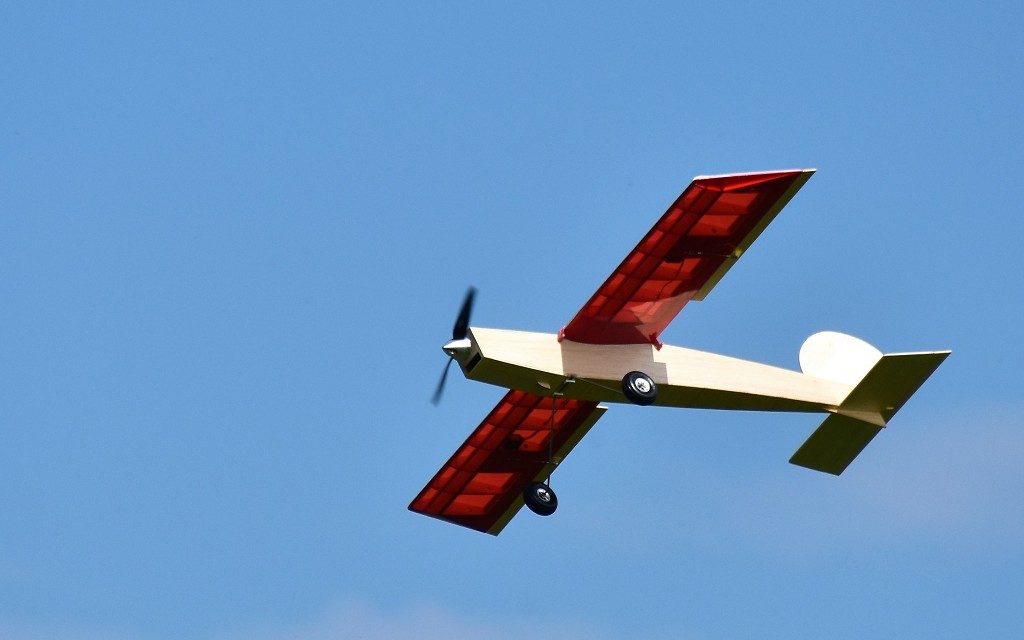
Here I want to show you my version of the Ugly Stick (SFC stands for Sport Flying Club). It was designed by a fellow club member more than twenty years ago as a project for our youth group. He provided some drawings the wing ribs and fuselage frames as milled parts and a stack of balsa wood for the remaining components. At that time, I obtained such a stack of material but never found the time to build the model.
Last year a new competition was devised in our club. We called it the “Fun Cup”. The rules: Within four minutes, as many rounds as possible had to be flown around two turnstiles 40 meters (~131′) apart. Within each round a “touch and go” had to be done in a landing field of 10 meters (~33′) in length. You got additional points for the final landing.
I really wanted to take part in this competition. But until that time, I had only flown gliders and did not have a single model with landing gear. What could I do? In February this year I discovered the material for the Stick in my cellar and started building immediately.
Originally, the wingspan should be 140 cm (~55″), but I decided to reduce it to 112 cm (~44″). The total length of the fuselage is also 112 cm. The wing was covered with transparent OraLight, white on the top and red on the bottom. The fuselage and the tail feathers were just painted with clear lacquer. The model is powered by an electric motor (DYMOND GTX-3546 (910kV)) and a LiPo battery (3s1p, 3300 mAh). The prop size is 11×7. The total flying weight is 1400 g (~50 oz).
The model flew very well. Since I had little time to train the “touch and go” part, my participation in the competition was not so successful. But most importantly, the model is still intact!
The following picture shows me holding the model after the end of the competition.
The model is controlled by an old Varioprop transmitter that I converted to 2.4 GHz.
How My Guitar Playing Started
On my 12th birthday my uncle gave me a guitar. It was an Archtop made by Framus. Sorry, but I don’t have it any more.
My parents payed for the weekly guitar lessons. My teacher was Mr. Thomsen in Elmshorn, Germany. This lasted until I was 16 years old. At that time I was pretty good in accompanying swing and dance music.
When I started my apprenticeship in electro mechanics, I put away the instrument and stopped playing. I became more interested in Model Flying and Ham Radio.
Between 1970 and 1974 I was a Radio Operator (Sparks) on various reefer ships, like the “Pica” of the “Laeisz” company:

On the long and lonely trips I missed my guitar. On one of our stops in Bordeaux, France, I took the opportunity to buy a classical instrument. It was nice to play again and it made my life on board easier. When I left the ship in Rotterdam, it was no problem to bring the guitar home.
After my holidays I had to enter the next ship in Los Angeles. Since I did not want to carry so much luggage, I left the guitar at home. Our first trip was to Tokyo, Japan. I only had a half day off to do some shopping. When I walked past a music shop, I saw an infinite number of guitars hanging on the wall. I could not resist and bought one of them, a Yamaha G-150A.
During one of my journeys my parents had to move and wanted to get rid of all “unnecessary” things. So they sold the Archtop and the guitar from Bordeaux.
How I Rediscovered My Guitar
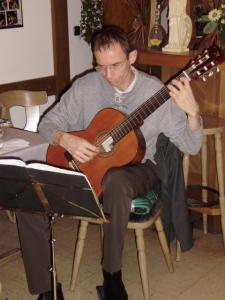
After many decades, in 2008, I rediscovered my Yamaha. It had spent its life in its gig bag covered with dust and had been pushed around from one corner to another. Despite the poor treatment she was in relatively good condition. The D-string was broken and there was a small dent in the front binding. After cleaning it and putting new strings on, I tried to play it again. The sound was pretty good and I could still remember some of the chords. But my playing had become very bad.

In the summer of 2008 I attended a classical guitar concert of Heinrich Wittrock in Darmstadt. I really loved his music. At the end of the concert I gathered all my courage and spoke to him. He was very friendly and I asked him if he knew someone who could give me some lessons. I was very surprised when he offered me to do it. We agreed on a date and started our weekly guitar lessons. He showed me everything; that is, he gave me a complete classical guitar training. Now I really learned to understand sheet music. The picture shows Heinrich playing on my 60th birthday party.